If you haven’t seen the parent post for this article, jump back here to see a complete list of all new features in Configuration Manager 1902.
This post covers the specific additions and improvements to the operating system deployment features that were added to Configuration Manager 1902.
Progress status during an in-place upgrade (IPU) task sequence
Microsoft added progress status into in-place upgrade task sequences. This is another great feature that I’m sure many will appreciate as the reliance on IPU increases. Note that this is for Windows 10 devices exclusively and quells concerns for admins or end users that there is no progress on the task sequence that is running.
I shamelessly stole Microsoft’s screen shot for this one in the absence of opportunity to do full testing yet.

Improvements to task sequence media creation
Task media creation got a little update which now allows to specify a staging area for the temporary data that is created during the media creation process. The default location is within appdata\local\temp of the users profile who is creating the media. This a very good addition as I have seen this cause issues in the past.
We can also now generate our own media label for the task sequence media. The default name is of course Configuration Manager but we can now name that to something that may be more appropriate such as the task sequence name, location, department etc.

Import a single index of an OS image
As you are probably aware the default install.wim file associated with Windows 10 nowadays actually contains all SKUs of the product (except for LTSC or IoT). In most cases an organisation would use just one or two of the editions within the install.wim so this will allow us to be more specific and save a little disk space in the process.
Several notes to make here…
- Note that you cannot type in the path test box, only hit browse. I understand this is due to efficient data validation on the path inside that text box.
- Note the tick box in here when you import a WIM file which enables us to then go and choose an image
- You should then select the index that you require
- **IMPORTANT** The extracted WIM file will automatically be stored in the same folder as the source

Once we continue through the wizard for this we can see that the destination path and file name are confirmed for your info.

I ran a size comparison between the original Windows 10 1803 SAC WIM with all indexes and the extracted Enterprise WIM. The results are below, about 400MB in this instance which is not a huge amount comparatively but when scaled could save a lot of storage and network traffic. I have not yet tried against the other indexes but will update this post once I do.
![]()
Optimized image servicing
This addition goes hand in hand with the previous one as it ONLY APPLIES TO SINGLE INDEX WIM FILES. We can now ‘optimise’ the image servicing by also removing superseded updates from the image. I think this is fantastic and should help keep your WIM files trim and proper for a more optimised distribution and indeed build.

Improvements to the Run PowerShell Script task sequence step
A number of additions have been made for running PowerShell scripts within a task sequence. First, we can now simply type, import or copy in a PowerShell script into the ‘Run PowerShell Script’ task without having to add the script to a package and distribute it etc. Whilst you can still do that, this allows more flexibility and does not require is to distribute the content which is handy. Note that you can also edit an existing script in this manner too, it’s not a static entry.
If we hit the ‘Open’ button, we can go browse for a ps1 file and import that into the dialog box. If we hit the ‘Browse’ button we can go select a previously added Run Script and use that. Also note the edit tick box. When you try to amend an existing entry the whole script is greyed out, you need select edit before making your changes. Great addition!

The second item here is saving the output of your script into a task sequence variable. If your script returns an output, then you can store this by entering your own variable name in the highlighted text box and the use this elsewhere in your task sequence perhaps as a condition on a further step. This unlocks lots of potential and I look forwards to playing with this one a bit more in the near future

In addition to these features, if you wish to add your script parameters into the task sequence logging (SMSTS.log) then you must add a step prior to the Run PowerShell Script step, this will enable logging of the script parameters into your log files.

You need only do this once in the task sequence and I suggest you should do this at the beginning. The default behaviour if this parameter is not set, is to NOT log any script parameters into task sequence logging.
Other improvements to OSD
On top of these other awesome additions we also have a further sprinkling of new gadgets to play with.
Now, we have a view option on a task sequence, which I find very handy. Also note – When you double click a task sequence the default action will now be view, not properties.

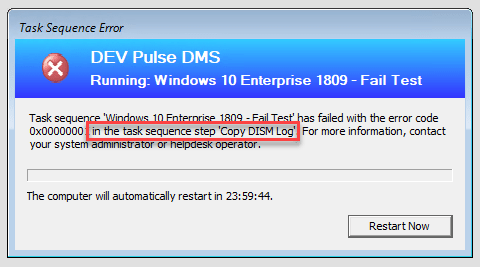
Also new, we have additional information when a task sequence fails. The usual dialog failure window will now show us the task sequence step that failed. Super useful.
The task sequence variable OSDDoNotLogCommand task sequence variable has had a slight uplift in that it will now also hides the command line itself from a ‘Run Command Line’ where previously it only hid the program name. This will assist anyone with security concerns over information passed in a command line or indeed multi-tenant environments which may share task sequences.
Finally in OSD improvements, the distribution point PXE without WDS functionality that was introduced in 1806 can now be applied to a DHCP server. Previously this was not the case and was an issue for many distributed or smaller organisations that ran a single server with multiple roles perhaps in a small branch office.


Pingback: Configuration Manager 1902 is released–What’s in and what’s out? | More than patches