This is the first of a three part blog which covers a walk through of Microsoft Azure Active Directory Identity Protection. Other parts can be found here:
Part 1 (this one)
What Identity Protection is, what you need and what the policies are.
Part 2 – https://morethanpatches.com/2020/12/04/microsoft-identity-protection-2
Looks at the reporting sections and what information Identity Protection can give us.
Part 3 – https://morethanpatches.com/2020/12/04/microsoft-identity-protection-3
Covers the notification capability and how else we can use Identity Protection.
As someone with a focus generally more around device management, there’s lots of technologies you have an awareness of but never get the opportunity to properly get your head into. Microsoft Azure Active Directory Identity Protection is one of those things for me however I’ve recently been working more with this and really, if you have access to it through your licensing (SPOILER ALERT: NOT EVERYONE DOES) then I think it’s a no-brainer.
What is it?
Microsoft Identity Protection in a nutshell is a tool used in combination with Azure Active Directory (AAD) to learn and report about user accounts and their sign-ins that are deemed to be ‘risky’ in some way. Not only that, the system can remediate certain risks and of course enable reporting on this. There are a number of criteria that are determined to identify what qualifies as a risky sign in, not all will be clear to you but they are based on Microsoft’s experience with massive amounts of data and signals from things like Azure AD, Microsoft (public) accounts and Xbox.
I’m quoting direct from the docs for this one, but Microsoft identify risks in the following classifications (What is Azure Active Directory Identity Protection? | Microsoft Docs)
| Risk detection type | Description |
|---|---|
| Atypical travel | Sign in from an atypical location based on the user’s recent sign-ins. |
| Anonymous IP address | Sign in from an anonymous IP address (for example: Tor browser, anonymizer VPNs). |
| Unfamiliar sign-in properties | Sign in with properties we’ve not seen recently for the given user. |
| Malware linked IP address | Sign in from a malware linked IP address. |
| Leaked Credentials | Indicates that the user’s valid credentials have been leaked. |
| Password spray | Indicates that multiple usernames are being attacked using common passwords in a unified, brute-force manner. |
| Azure AD threat intelligence | Microsoft’s internal and external threat intelligence sources have identified a known attack pattern. |
What I think I like most about Microsoft Identity Protection is the masses of complexity that will be involved at the back end, is boiled down to relative simplicity for you the admin in the portal. Having spent over a decade as a sys admin I’m wondering how I would know this kind of information otherwise despite it undoubtedly happening day in day out. I am not in any way a security specialist, but this tool opens your eyes to that without having to be an expert either. I’m a fan.
Full link to official docs here – What is Azure Active Directory Identity Protection? | Microsoft Docs
Do I have this?
OK let’s get the spoiler out of the way, you need Azure Active Directory Premium Plan 2 (AAD P2) to use this fully, however you can get some limited information only with a P1 license. You will have AAD P2 as part of Microsoft 365 E5 or some other license model or add-on, it’s not available for M365 E3 licenses or similar licenses regarded as ‘standard’ offering. I’m not going to dive into licensing though else I might drown, please consult with your licensing specialist. Let’s make it easy to check though, get yourself to Azure Active Directory and check what it says – Microsoft Azure AD

If you have Azure AD Premium P2 shown then you have this, even more reason to use it as you’re paying for it. If you don’t have AAD P2 then not all is lost, but I’ll be honest most is so why not spin up a trial and see it for yourself. You can still see some limited information about risky users and risky sign-ins but not the detailed information and you can’t set your own policies or get notifications etc. Check here – https://docs.microsoft.com/en-us/azure/active-directory/identity-protection/overview-identity-protection#license-requirements
What are the limitations?
With anything there has to be a limitation somewhere. Azure AD Identity Protection WILL work with these account types
- Azure AD users
- Synchronised users for Active Directory
- Federated identities (such as ADFS)
- B2B identities for sign-in based risks only
Importantly as you might expect, there are some limitations around B2B account capabilities. For example we can’t define the user risk as we don’t have that data, additionally we can’t provide remediation for the users. Also the users won’t appear in the risky users report so be aware of that. There is more guidance provided here – https://docs.microsoft.com/en-us/azure/active-directory/identity-protection/concept-identity-protection-b2b
OK, show me then
Firstly, you can get to this through its own blade in the Azure portal just search for “Identity Protection” at the top of the portal. As is typical, you can link to this from elsewhere too, but I find the search is probably the easiest way to get straight there.
We hit the landing page which shows the overview including some statistics which you might find interesting. If this is a first time visit don’t expect to see much information just yet.
 We can see that this is split into 3 main areas + general troubleshooting.
- Protect
- Report
- Notify
Makes sense right? Protect your user identities, report on it and also be notified is something untoward is going on. This goes back to my point around simplifying something that is inherently complex. We’ll break this up into those sections and walk through each.
Protect
So under protect we have options to set:
- User risk policy
- Sign-in risk policy
- MFA registration policy
Lets be clear on these. User risk policy defines the risk associated with a user account itself and not associated with a specific real-time activity such as an active sign-in. Think of this like the case-book of what we already know about that user account and what it’s been up to before an event such as a sign-in. Then the sign-in itself has its own policy and we take in the information from that real-time activity and generate a risk level. If the sign-in is happening from somewhere unusual, maybe from a device we don’t know or trust, from an IP we know as being associated with wrong’uns etc. We’re going to combine these factors and spit out a rating of how suspicious we think this authentication attempt is. Think of these extreme examples:
User signs in from a known device which we manage, from the same location they usually sign in from and they got their authentication credentials (password, MFA, hardware key etc) right first time. We’re likely going to see something like that with a low rating on the scale of dodginess.
Alternatively…
User signs in on the other side of the world from their usual login, 2 hours after they last logged in and they typically never travel for work. They’re using a device we don’t know and they’re repeating authentication attempts one after the other. We’re likely going to see something like that with a high rating on the scale of dodginess.
Now these are extreme and technically inaccurate examples, but they illustrate the point. The policies you set in your tenant are basically defining what you deem as an acceptable level of ‘dodginess’ in my colloquial terms and then what you want to happen when something occurs that goes above that level of what you deem acceptable. There is undoubtedly a bit of trial and error in here as each organisation is different, using different scenarios, in different locations and on top of all that Microsoft are not going to expose their exact criteria of risk in some cases as that obviously gives an opportunity to bypass.
User risk policy
So User risk policy goes like this in common terms.
- Who do you want to apply this to? – Users
- What is your acceptable risk level? – User Risk
- What do you want to happen when something goes over that? – Access

I’m not going to walk you through each one, you’ll see it’s fairly self explanatory. On the Access section you can either block or allow access, or allow and force a password change. Just think that through and of course that gives you a great opportunity to test and pilot as we can add groups one at a time. Be aware though, this is the only policy we can set but we can make exclusions if you really need to. I often hear of organisations wanting to take a lower risk approach for VIP employees as we need to make life easy for them, I understand that 100% but also consider that these people are often high profile targets in your organisation. If you get the policy right, there shouldn’t really be an exclusion.
Of course, don’t forget to enforce the policy if you want to actually use it.
PS: in this example policy, I’m deliberately trying to capture any events for testing so my risk level is set low, you may not want this.
Sign-in risk policy
Similar to the user risk policy, we have the following options:
- Who do you want to apply this to? – Users
- What is your acceptable risk level? – Sign-in risk
- What do you want to happen when something goes over that? – Access
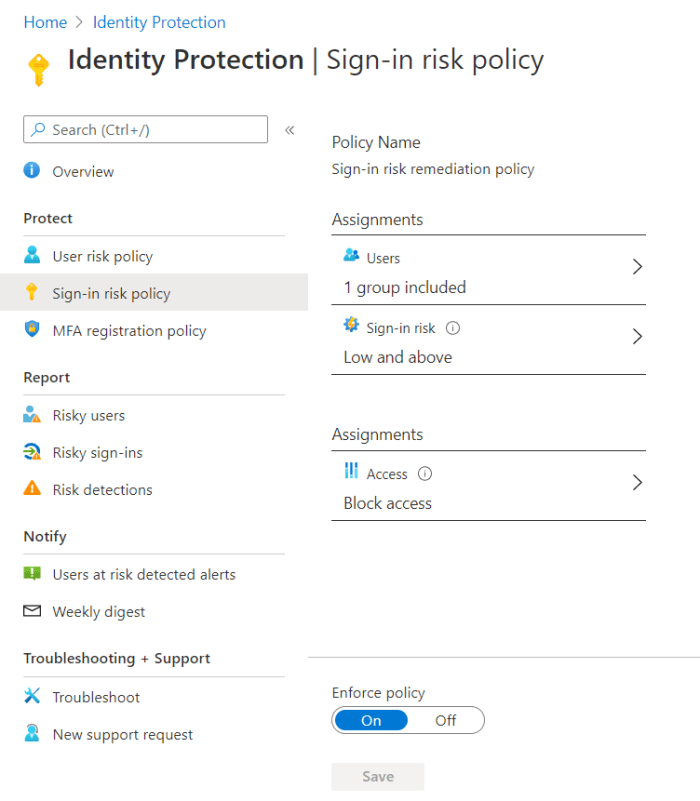
Again, I’m not walking you through each one, it’s self-explanatory. The Access options here though are to block or allow, and allow with MFA. Remember though in this case you need your user to be registered with MFA up front else they are simply blocked. Again think this through and consider it’s the real-time risk from that sign-in. Maybe you want that as high but the user risk at a lower level, or indeed vice versa as it can depend on your organisation and the typical behaviour.
Again, don’t forget to enforce the policy if you want to actually use it.
PS again: in this example policy too, I’m deliberately trying to capture any events for testing so my risk level is set low, you may not want this.
MFA registration policy
As mentioned in the sign-in risk policy, if you’re going to force people to MFA you need to make sure that they’re registered. As you would expect, this blade allows you to include and exclude users or groups in MFA registration. Note too this is relevant only to Azure MFA, not MFA server or a third party MFA provider you may have integrated. What will happen now is your users in scope of this will be given a prompt to register for MFA next-time they make an interactive authentication and they have an option to defer for up to 14 days.

You should most definitely register ALL of your users for MFA regardless of whether or not you are using Identity Protection. (Caveat break-glass accounts, some service accounts etc etc).
Again, don’t forget to enforce the policy if you want to actually use it.
That’s it for this post. You can find part 2 here – https://morethanpatches.com/2020/12/04/microsoft-identity-protection-2
/Peter

Pingback: Microsoft Azure AD Identity Protection Walkthrough – Part 2 | More than patches
Pingback: Microsoft Azure AD Identity Protection Walkthrough – Part 3 | More than patches