This is the second of a three part blog which covers a walk through of Microsoft Azure Active Directory Identity Protection. Other parts can be found here:
Part 1 – https://morethanpatches.com/2020/12/04/microsoft-identity-protection-1
What Identity Protection is, what you need and what the policies are.
Part 2 (this one)
Looks at the reporting sections and what information Identity Protection can give us.
Part 3 – https://morethanpatches.com/2020/12/04/microsoft-identity-protection-3
Covers the notification capability and how else we can use Identity Protection.
In part 1 we covered the policies, how to define them and what they mean. In this part we will look at some of the results of those policies with the Reports section of Microsoft Azure AD Identity Protection.
Report
Now, one of the keystones of AAD Identity Protection is automation. Realistically no-one is going to be able to keep track of all their users authentication requests so we rely on something computational to deal with the business as usual and then just tell us when something doesn’t meet the criteria we set in the aforementioned policies. The reports section is split in three:
- Risky users
- Risky sign-ins
- Risk detections
I think these again are fairly self explanatory and you can see immediately how risky users and risky sign-ins will relate to the policies we just set. To use another colloquial term, risk detections as you might expect is the actual meat and potatoes of this feature. These are what have been detected as risky on our so-called scale of dodginess.
NOTE: For completeness and if you want to test this yourself, I set my example policies to capture low risk and above events and then used Tor browser on an unmanaged VM to simulate some risky sign-in attempts.
Microsoft also provide some guidance on simulation for for Identity Protection – https://docs.microsoft.com/en-gb/azure/active-directory/identity-protection/howto-identity-protection-simulate-risk
Risky users
In my example, I can see a couple of users which were detected at high risk.
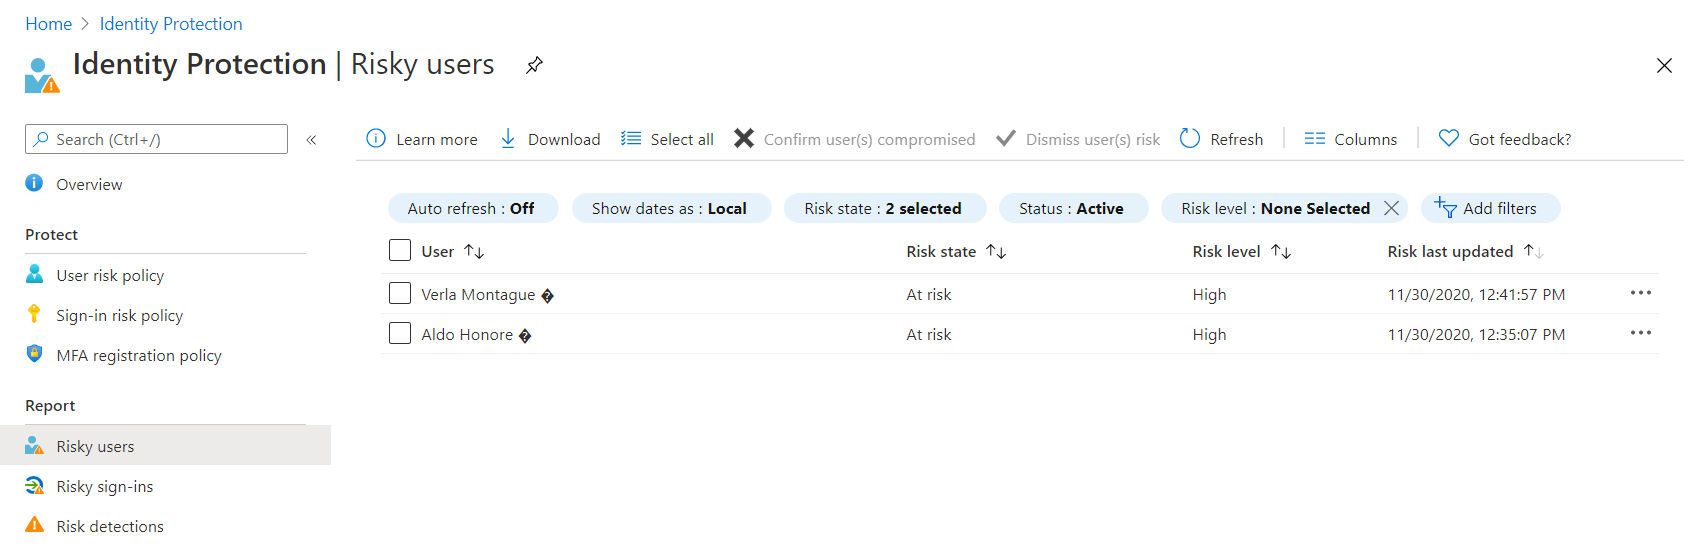
Note in particular the options along the top, I wouldn’t want you to miss something because your Auto refresh was set to Off or you were only viewing Remediated risks.
If we select one of the Risky users, we get a split pane appear from the bottom and here we can start to drill down into the info and take appropriate action should we wish to do so.

Again, I’m not going to walk you through every single item in here, but take a look through the tabs:
- Basic Info
- Recent risky sign-ins
- Detections not linked to a sign-in
- Risk History
These will all give you some of the context that you need to make a decision on whether you think the user is still legitimate or may have been compromised. It might be that the user is raising questions about sign in attempts being blocked or simply unusual behaviour etc. The info in here is extremely useful and having visibility of all this is crucial to making an informed decision.
Once you’ve reviewed the information you will note that you can take an appropriate action:
| Action | Result |
|---|---|
| Reset password | Forces an immediate password reset (which you generate as a temp PW). |
| Confirm user compromised | Marks the user as compromised which marks it as high risk. In turn this is fed into the back end learning systems for future detections. THIS CANNOT BE REVERSED. |
| Dismiss user risk | Marks the user as not at risk. In turn this is fed into the back end learning systems for future detections. THIS CANNOT BE REVERSED. |
| Block User | Blocks/Disables the user account. This toggles to Unblock user if selected and can be reversed from Azure AD too. |
| Investigate with Azure ATP | Takes you out into the Microsoft Cloud App Security portal where you can look in more detail. |
More information on what providing risk feedback means can be found here – Provide risk feedback in Azure Active Directory Identity Protection | Microsoft Docs
Risky Sign-ins
In this section, we see the specific sign-ins but for all users. This blade provides a level of specifics including time/date of the attempt, IP address and location amongst other things.

Note again that there are several filters available in this report so make sure the values reflect what you are looking for. Be aware that this is the default view only and there are quite a number of additional columns available to give you more or less information. If you don’t see this select the three dots … in the upper right for more.

Maybe we also want to download the data into a CSV file or JSON file, perhaps you’re feeding this into another system or application for further assessment. This option is available with a maximum count of 250,000 records. If you filter first then export, you can export just those results, this is the recommendation. For large amounts of data this may take a minute or so to generate the export file.
We also have an option to Export Data Settings in this view. This is essentially a method we can use to export platform diagnostics to something like a storage account, Log Analytics or and event hub if you are streaming the data elsewhere. You will note that the log types include:
- AuditLogs
- SigninLogs
- NonInteractiveUserSignInLogs
- ServicePrincipalSignInLogs
- ManagedIdentitySignInLogs
- ProvisioningLogs

If we start to find recurrences of IP addresses or countries and you decide that these are actually legitimate, we also have the option to add a trusted location using the ‘Named locations’ feature. You may have seen this elsewhere in Azure AD, for example in Conditional Access as of course the two are closely linked. I won’t cover that in this post but Microsoft provide a nice article here – https://docs.microsoft.com/en-us/azure/active-directory/reports-monitoring/quickstart-configure-named-locations
We also have an option to confirm a sign-in as compromised if we know that is. In-line with the link to providing risk feedback, this action will move the sign-in and user account to high risk.
Risk Detections
The last option under reporting is for risk detections. If you read the last two sections this should be fairly self-explanatory by this point as it’s a summary of all the risks that have been detected. Those detections will tally with the sign-ins and of course users as you would expect. If you want a summarised view of risk activity across your identities. You can again export this list to a CSV or JSON with a limit of 250,000 records.
There are filtering options available in here again so use these to amend the results. Be aware you can only go back a maximum of 90 days. Ideally this will be a daily check for someone if there are no notifications set up to alert.
Note that we can select a detection type and you might notice that these are not exactly the same as those in the ‘What is it’ section at the beginning of this post series. Remember here that this risk detections list will include lots of data that may typically not be a risk at all, it might be simply what you may call unusual. E.g. Atypical travel would likely have flagged for me in recent years as I would move from city to town day by day and week by week. The pattern would be difficult to predict but it is legitimate activity.
If we select specific risk detection, we can see there is lots of information available around things like risk state, risk level, source and detection time. You will also notice a request and correlation ID. These are used as you expect to correlate activities together and you should note you can click these specifically to jump to the sign-in.
More actions available in the lower pane include:
| Action | Result |
|---|---|
| User’s risk report | Takes you straight to that user which is in the Risky Users report. |
| User’s sign-ins | Takes you to ALL that users sign-ins. Not just risky ones. This can be useful to establish a pattern or general activity information. |
| User’s risky sign-ins | Takes you to the user’s risky sign-ins only which is the Risk Sign-ins report. |
| Linked risky sign-in | Takes you specifically to the linked risky sign-ins. There may well be multiple and they will correlated. |
| User’s risk detections | Takes you to all risk detections for that user account. |
That’s it for this post. You can find the 3rd and final part – https://morethanpatches.com/2020/12/04/microsoft-identity-protection-3
/Peter


Pingback: Microsoft Azure AD Identity Protection Walkthrough – Part 3 | More than patches